
Train a basic wild mushroom classifier
Train a basic image classification model to identify 5 types of wild mushrooms, with Transfer Learning, Tensorflow, Tensorboard, MobileNet, and ImageNet images. Inspired by the Tensorflow for Poets Google Lab.
Earlier, we learnt about transfer learning with Tensorflow for Poets retrain scripts, and how to download images from ImageNet. In this article we will focus on combining these concepts and techniques and build a more specialized machine learning application.
Build a Basic Wild Mushroom Classifier
In this tutorial, we are going to build a very basic image classification model together, to identify 5 types of wild mushrooms
- Fly Agaric (view on ImageNet: n13003061)
- Scarlet Elf cup (view on ImageNet: n13030337)
- Common Stinkhorn (view on ImageNet: n13040629)
- Giant Puffball (view on ImageNet: n13044375)
- Earthstar (view on ImageNet: n13044778)
But before getting our hands dirty let’s take a step back and form our high level strategy. We’ll use Google’s 7 Steps of Machine Learning to guide our implementation process.
Google’s 7 Steps of Machine Learning
Let’s review quickly the Google’s 7 Steps of Machine Learning (see 9:38 - 9:53):
Expand these 7 steps to suit our Wild Mushroom Classifier Project:
- Gathering Data
- Download reasonable amount of labelled images per wild mushroom type from ImageNet. We’ll need at least 250 labelled images per category: 200 for retraining (80% train, 10% validation, 10% test), and 50 for demo predictions later.
- In other words, we will have at least 1250 labelled images for retraining (5 categories x 200 per category), and 250 labelled images for demo predictions (5 categories x 50 per category).
- In total we will have 1500 images (1250 for retraining, and 250 for demo).
- We’ll use ImageNet_Utils to help us download labelled images from ImageNet easily. Note that we’ll likely download more than we need to begin with. But that is ok, as we’ll only pick what we need in the data preparation phase in step 2 (250 labelled images per category).
- Preparing that Data
- Now that we’ve downloaded many images from ImageNet, we’ll manually pick 250 images per category and copy into a new directory structure (say, to a folder called
shrooms_250_clean). This will also help us avoid data imbalances, as we’ll have equal amount of images per category. - Do the image cleansing in our newly created
shrooms_250_clean. e.g..jpgformat, non corrupted, must be in correct category, non flickr dummy image, reasonable file size, etc. Delete as appripriate. - As we do the image delete we may fall short on the 250 images per category target. Just copy more over any unused images (obtained from end of step 1.)
- Now that we’ve downloaded many images from ImageNet, we’ll manually pick 250 images per category and copy into a new directory structure (say, to a folder called
- Choosing a Model
- We will use Tensorflow for poets as our starting point baseline guide.
- We Tensorflow for poets scripts are compatible with two models: Inception v3 and MobileNet.
- Inception v3 is more accurate but heavier.
- MobileNet is slightly less accurate but lighter and more suitable for low-power embedded devices.
- Since this is our first attempt, let’s go for something light. We will use the MobileNet model. (plus, at some point in future we may consider running our trained model on an embedded device offline, with Raspberry Pi and Intel Movidius Neural Compute Stick).
- Training
- Run the Tensorflow for poets retrain script
retrain.pywith the appropriate options. - Use tensorboard to monitor training progress and performance. We will focus mainly the accuracy and cross entropy charts for now.
- Run the Tensorflow for poets retrain script
- Evaluation
- Again, use tensorboard to monitor training progress and performance (mainly accuracy and cross entropy charts)
- Hyperparameter Tuning
- Can we improve our training accuracy (higher the better) and Cross Entropy Error (lower the better)?
- Again, use Tensorboard.
- Note: we will likely do this tuning under a separate article / tutorial.
- Prediction
- Remember our set-aside 50 demo images (per category) that were not used for training? Let’s use our now trained model to perform prediction (aka inference) with the help of Tensorflow for poets prediction script
label_image.py, with appropriate options. - Of the 250 demo images (5 category x 50 images per category), how many did the model predict it correctly?
- For the ones that the model predicted wrong, what do the images look like? This will give us an idea of whether the error is reasonable. For instance, if even a human would have a hard time classifying the image, maybe the model is not doing that bad?
- (optional) create a program that automatically display images one by one (or in small batches), and perform prediction (and compute overall accuracy and error rate) in the same time? This may be good for showing off / demo purpose? (This will be covered under a separate article / tutorial instead)
- Remember our set-aside 50 demo images (per category) that were not used for training? Let’s use our now trained model to perform prediction (aka inference) with the help of Tensorflow for poets prediction script
KISS - Keep it Simple, Stupid
Our aim is to get things working as quickly as possible - understanding just enough about the high level process and implementing the workflow and get to the end. By walking through the process we will gain an appreciation on how we may potentially improve the process a bit. But that will be another job for another day. For now, let’s keep it simple and stupid: we will complete an iteration loop as quickly as possible, from start to finish, and see some end results.
OK, buckle up. Here we go.
Directory Structure
For ease of explaining, i’m going to assume any Github repositories are stored at ~/repos. i.e. our directory structure will eventually look like this:
|- repos
  |- github-repo-1
  |- github-repo-2
  |- etc.
If you do not have a repos folder in your home directory, create it now:
$ mkdir ~/repos
$ cd ~
We will need two repositories in our repos:
|- repos
  |- my-ImageNet_Utils
  |- my-tensorflow-for-poets
The two repositories above are actually from Github. You can download (and rename) these two repositories to your mac locally by doing this:
$ cd ~/repos
$ git clone https://github.com/tzutalin/ImageNet_Utils my-ImageNet_Utils
$ git clone https://github.com/googlecodelabs/tensorflow-for-poets-2 my-tensorflow-for-poets
Notice that I’ve renamed the original Github repositories ImageNet_Utils to my-ImageNet_Utils, and tensorflow-for-poets-2 to my-tensorflow-for-poets. This is purely to avoid potential clashes or confusion if you happen already have ImageNet_Utils and tensorflow-for-poets-2 setup on your mac.
In this article however, I’m going to stick with my-ImageNet_Utils and my-tensorflow-for-poets, purely for instructional convenience. (In reality however you can name the repositories to whatever name you’d like.)
Step 1: Gathering Data
We download images from ImageNet with the help of this handy ImageNet_Utils tool, as introduced in a previous article. I’m going to recite the exact steps here:
Navigate to my-ImageNet_Utilsrepository directory (so we can see the Python files if we want to):
$ cd ~/repos/my-ImageNet_Utils
Ensure we have Python 2.7 environment setup (yes I know. We are in this age we should be using Python 3.6+ really. But from what I’ve tested so far, Python 2.7 works for this ImageNet_Utils tool. So just stick with it for now. We are only ever going to use it strictly for downloading ImageNet images). Let’s create a Python 2.7 environment with Anaconda (if you’ve already done this, skip to next step)
$ conda create --name py27p13 python=2.7.13
Activate the Python environment (Python 2.7.13 is what I use):
$ source activate py27p13
We should see our conda environment name in our prompt like this:
(py27p13) $
Now the fun part. We are going to download all ImageNet images for the 5 mushroom categories, as represented by the WordNet ID wnid.
Open a terminal and start downloading all the images of Fly Agaric:
(py27p13) $ cd ~/repos/my-ImageNet_Utils
(py27p13) $ ./downloadutils.py --downloadImages --wnid n13003061
This will download the images in a new sub-directory (within the ImageNet_Utils repository) at:
~/repos/ImageNet_Utils/13003061/n13003061_urlimages
There will be some minor errors during the download process, due to:
- URL no longer valid
- URL points to a website instead of an image
- etc
You can safetly ignore those errors. Of the many image URLs, we will at least get 250 (hopefully) good images, or more.
Do the same for the other wnid:
(py27p13) $ cd ~/repos/my-ImageNet_Utils
(py27p13) $ ./downloadutils.py --downloadImages --wnid n13030337
(py27p13) $ ./downloadutils.py --downloadImages --wnid n13040629
(py27p13) $ ./downloadutils.py --downloadImages --wnid n13044375
(py27p13) $ ./downloadutils.py --downloadImages --wnid n13003061
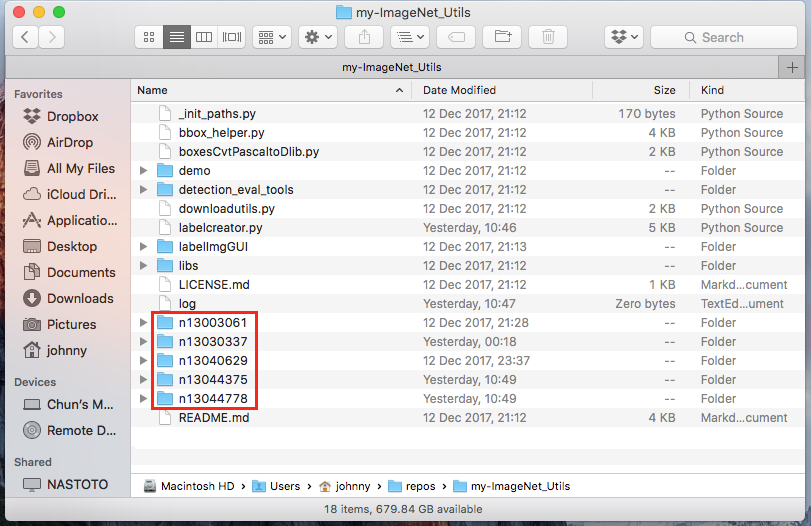
Once all is done we shall see our 5 new directories at ~/repos/my-ImageNet_Utils :
Let’s take a look at the downloaded images:
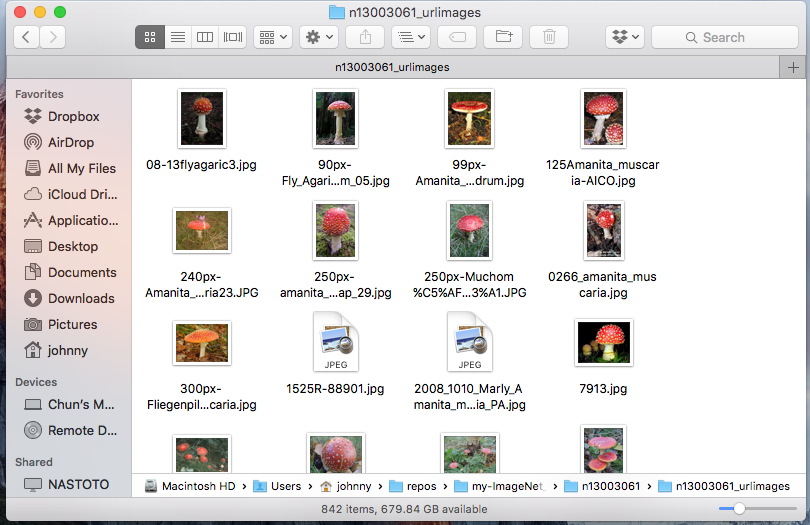
Fly Agaric images at ~/repos/ImageNet_Utils/n13030337/n13003061_urlimages:
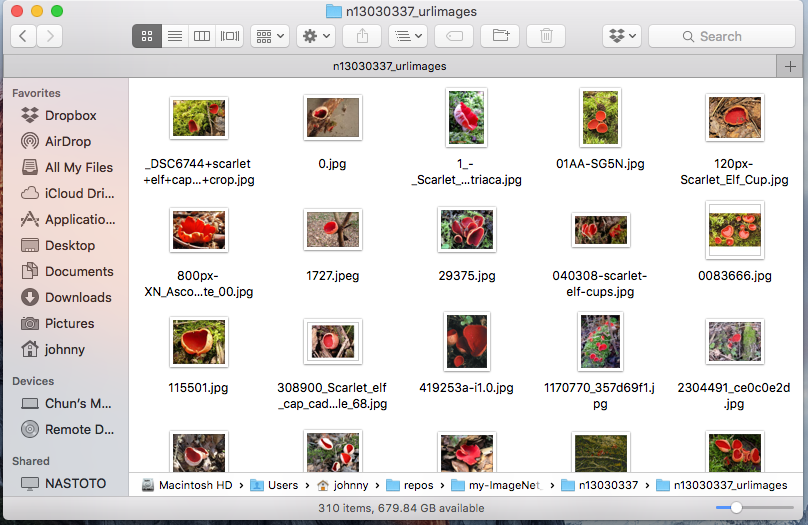
Scarlet Elf cup images at ~/repos/ImageNet_Utils/n13030337/n13030337_urlimages:
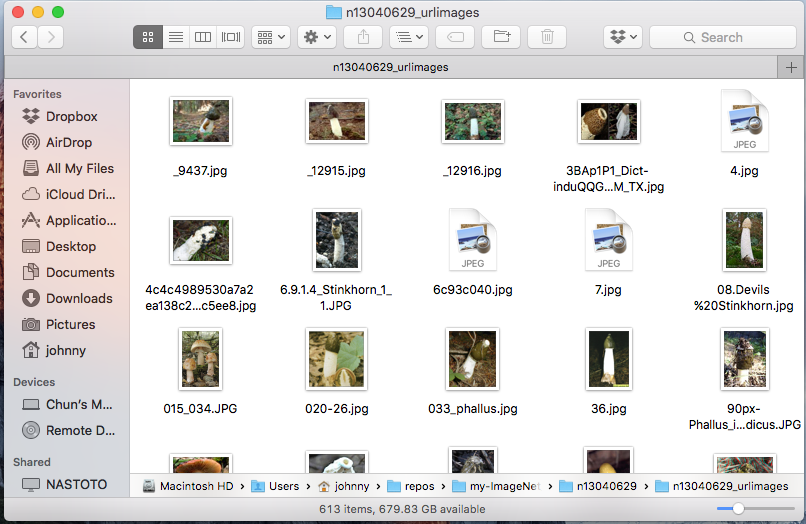
Common Stinkhorn images at ~/repos/ImageNet_Utils/n13040629/n13040629_urlimages:
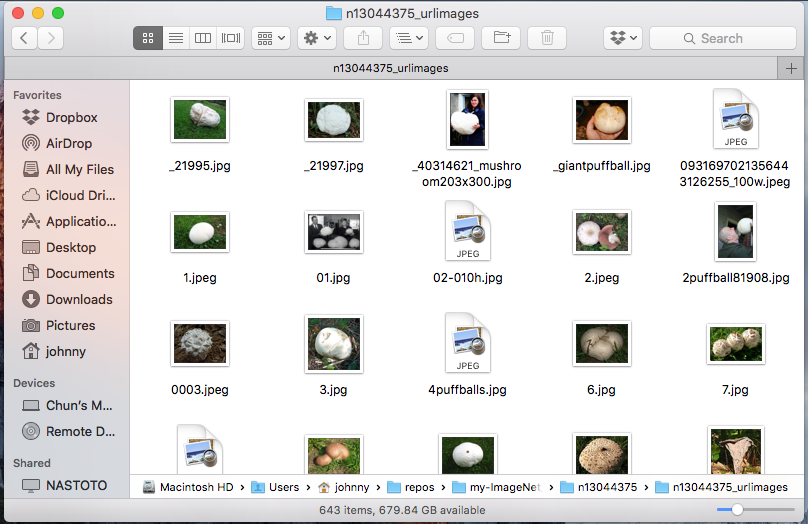
Giant Puffball images at ~/repos/ImageNet_Utils/n13044375/n13044375_urlimages:
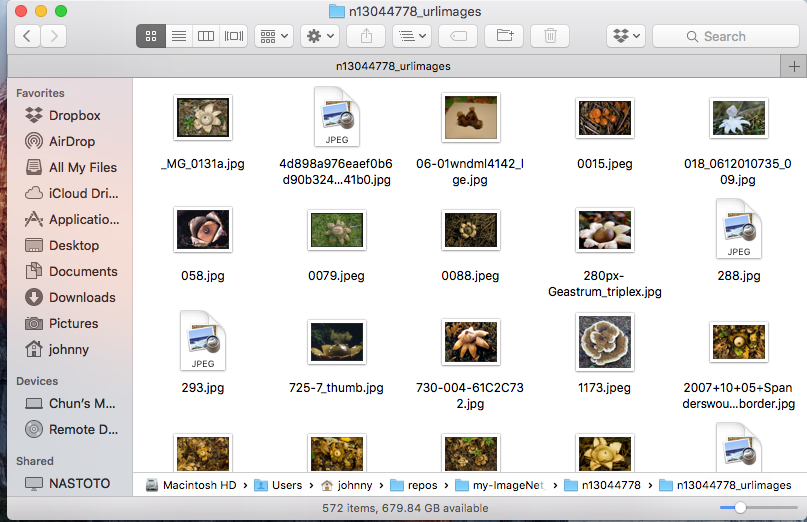
Earthstar images at ~/repos/ImageNet_Utils/n13003061/n13003061_urlimages:
Notice that we will inevitably have more images in certain categories than the other from our initial raw datasets.
Step 2: Preparing that Data
Decision: Pick our subset and clean (or the other way round?)
Now that we have the raw ImageNet images downloaded to ~/repos/ImageNet_Utils/, we have a decision to make: we can either (1) clean all the raw images, then pick our random 250 images per category, or (2) the other way round - pick aound 250 images per category, then clean this smaller subset. Let’s compare these two options.
Option (1): clean everything up front once and then pick our 250 images per category. Advantage of this is that know our entire dataset will be clean at the end of the data cleansing. This allows flexibility in long run - for instance, we will be able to select our fixed subset of any size, be it 250 images per category, 300 per category, or even 500 per category, we will be able to do that easily. The only drawback of this option is the massive effort in cleaning more data than we actually need upfront, for our initial prototype. If you have already done the tensorflow for poets tutorial previously, you’ll know that around 200 retrain images will be good enough to get started. If we look at fly agaric alone, we already have 850 ish images in this category - to clean all 850 fly agaric images when all we need is just 250 from that category, could slow down our first attempt to this exercise. Imagine we have 5 categories to clean! At the time of writing this, step 1 would have downloaded 842 Fly agaric images, 310 scarlet elf cup, 613 common stinkhorn, 643 giant puffball, and 572 earthstar. That’s a total of 2980 images to clean (when all we need is 1250 images: 250 per category x 5 categories). This option will likely double the number of images to clean than actually required.
Option (2): pick our 250 images per category, and then clean these subsets. Advantage of this is focus. We know 250 clean images per category is good enough. We pick only 250 raw images and focus on getting them cleansed. This will ensure we are not distracted too much upfront, at such an early stage. The downside of this option is that (as you’ve probably have guessed), is that we may occasionally fall short on images and have to import more. So say we have started with 250 fly agaric images, and we’ve found 30 dirty ones and ended up deleting them and reduce our bucket size to 220 fly agaric images. We then copy and paste the additional 30 unused fly agaric images to this bucket (to make it up to 250). We do the cleaning on this 30 images, find 5 dirty ones, delete them, and ended up with 245 clean images in this bucket. We repeat the process until we obtain the entire set of 250 clean fly agaric images. The downside as you see is the additional manual work involved. But with a systematic approach, it is possible to reduce the likelihood of dirty images in our 250 buckets. This option is not perfect, but for a first attempt in building this wild mushroom classificaton app, it is good enough for getting things done and gaining relevant experience, and so we will choose this option in this tutorial.
In this tutorial we will use option (2) - pick around 250 images per category, then clean this smaller subset.
Create a new folder dedicated to our 250 cleansed images per category
let’s create a new folder to store our ~250 clean images per categories:
(py27p13) $ cd ~/repos/my-ImageNet_Utils
(py27p13) $ mkdir shrooms-clean-250-each
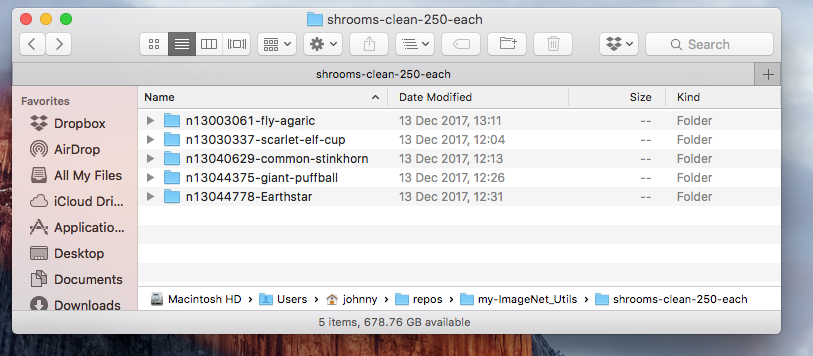
Within this shrooms-clean-250-each, let’s create 5 subdirectories with appropriate names:
(py27p13) $ cd ~/repos/my-ImageNet_Utils
(py27p13) $ mkdir n13003061-fly-agaric
(py27p13) $ mkdir n13030337-scarlet-elf-cup
(py27p13) $ mkdir n13040629-common-stinkhorn
(py27p13) $ mkdir n13044375-giant-puffball
(py27p13) $ mkdir n13044778-Earthstar
Our directory ~/repos/my-ImageNet_Utils/shrooms-clean-250-each should look like this:
Copy 250 images per category for cleansing
This step is a bit manual, but easy to do for first timer. Open up two Finder windows:
- Finder 1 points to the clean images directory:
~/repos/my-ImageNet_Utils - Finder 2 points to the retraining images directory:
~/repos/my-ImageNet_Utils/shrooms-clean-250-each
In Finder 1, sort the images by descending by file size. Copy the first 250 clean images per category over to Finder 2, like this:
| Category | Copy from Finder 1 | Paste to Finder 2 |
|---|---|---|
| Fly Agaric | ./n13030337/n13003061_urlimages/ |
./n13003061-fly-agaric/ |
| Scarlet Elf cup | ./n13030337/n13030337_urlimages/ |
./n13030337-scarlet-elf-cup/ |
| Common Stinkhorn | ./n13040629/n13040629_urlimages/ |
./n13040629-common-stinkhorn/ |
| Giant Puffball | ./n13044375/n13044375_urlimages/ |
./n13044375-giant-puffball/ |
| Earthstar | ./n13003061/n13003061_urlimages/ |
./n13003061-earthstar/ |
What is the reason for doing a sort descending by file size? It’s just a trick: images with larger file size is likely to be more valid than smaller ones. In particular, images with 2KB or below are very likely invalid images. Focusing larger size images will likely reduce the population of “dirty” images. But it’s entirely up to you how you’d like to do it.
Do some cleaning
Now, review the images in ~/repos/my-ImageNet_Utils/shrooms-clean-250-each/. Delete any invalid images as appropriate.
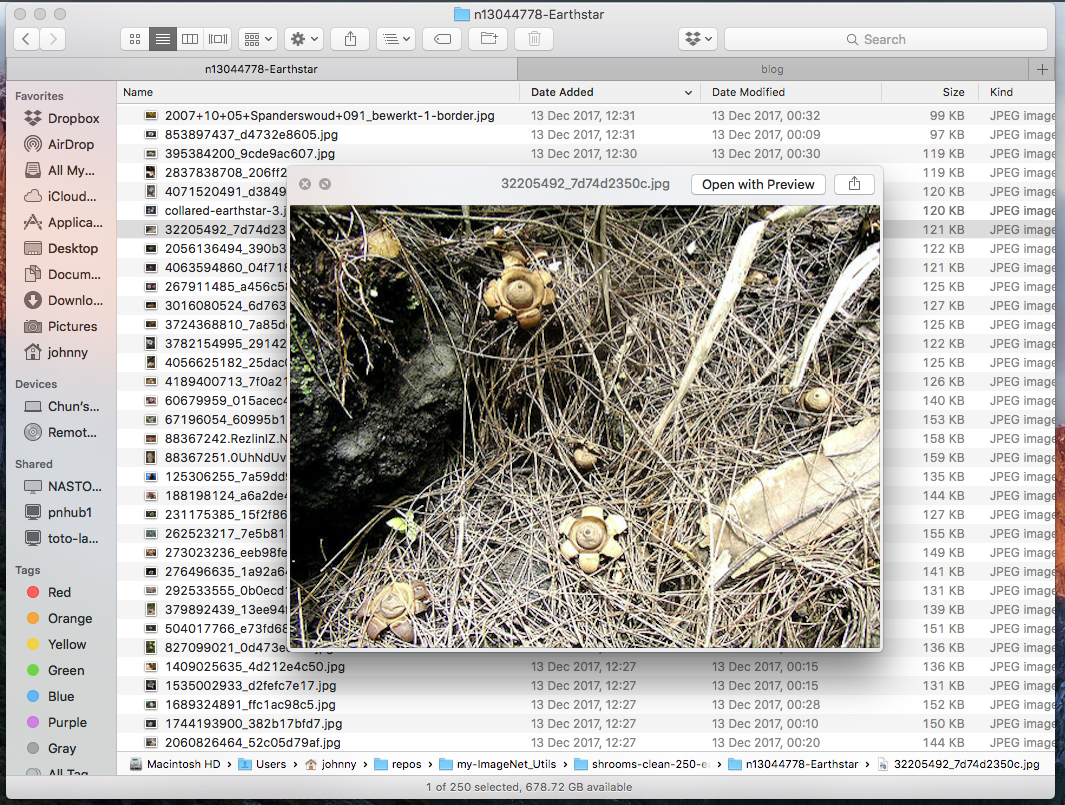
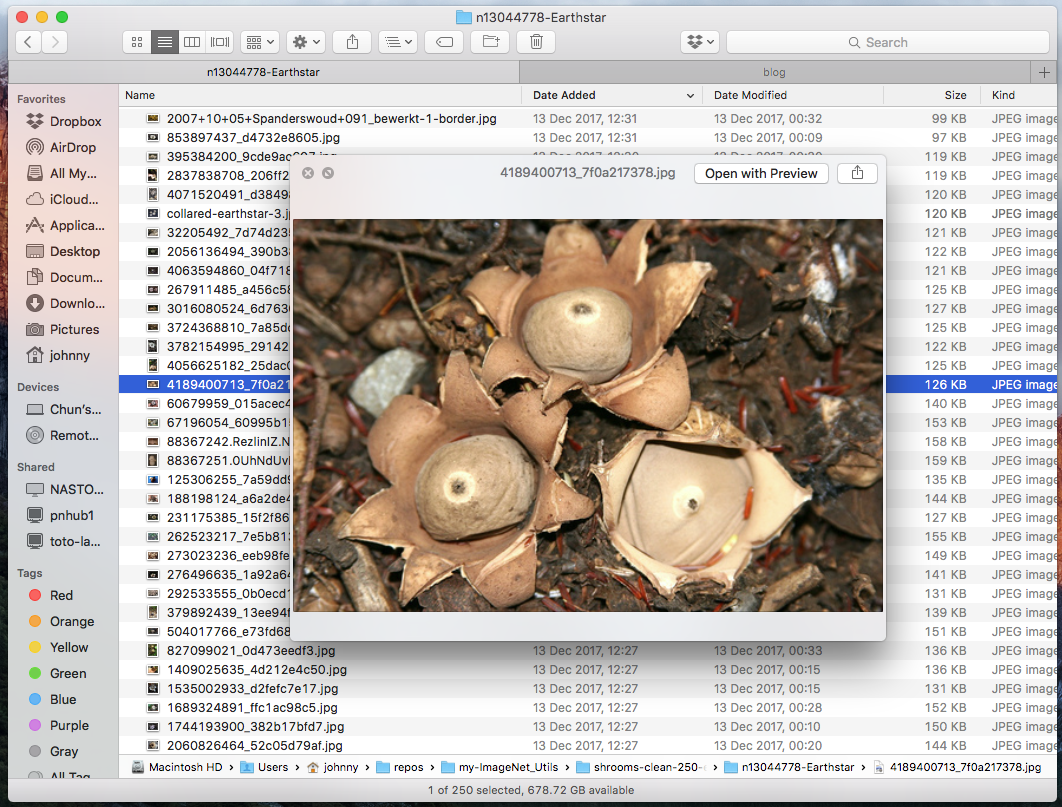
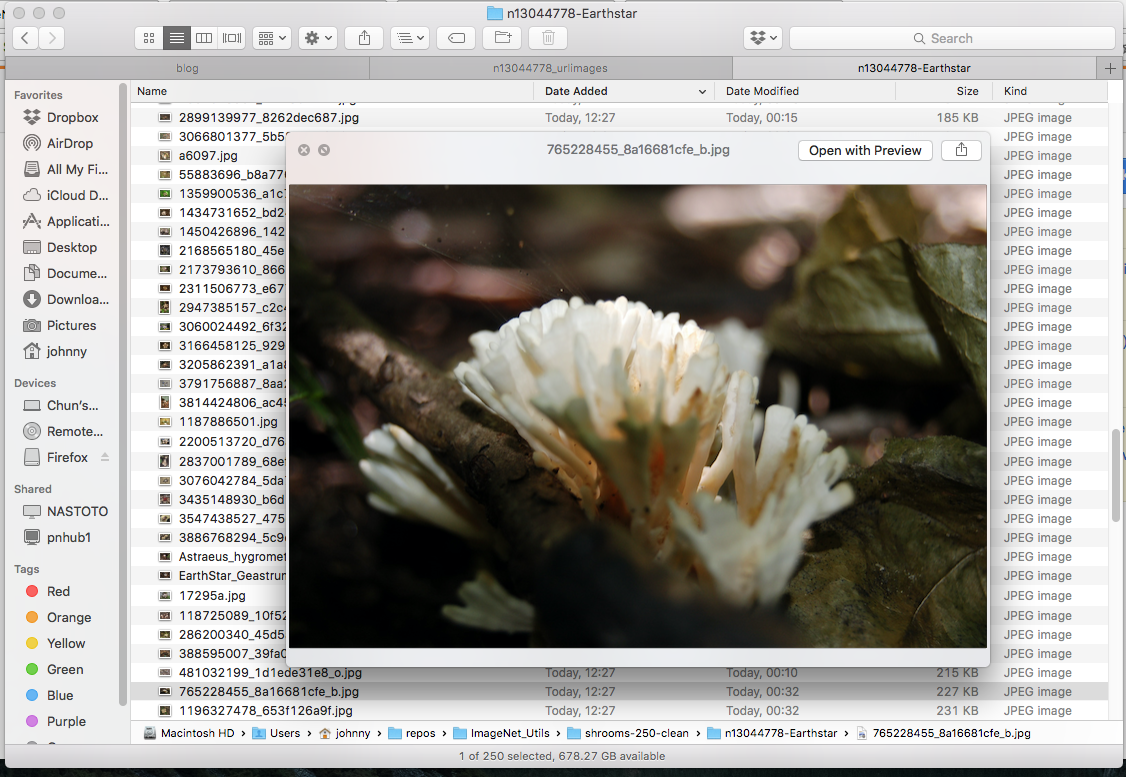
For example, while I was checking through my Earthstar images, these are what I consider valid and invalid images:
Example: Valid Earth Star (keep these)
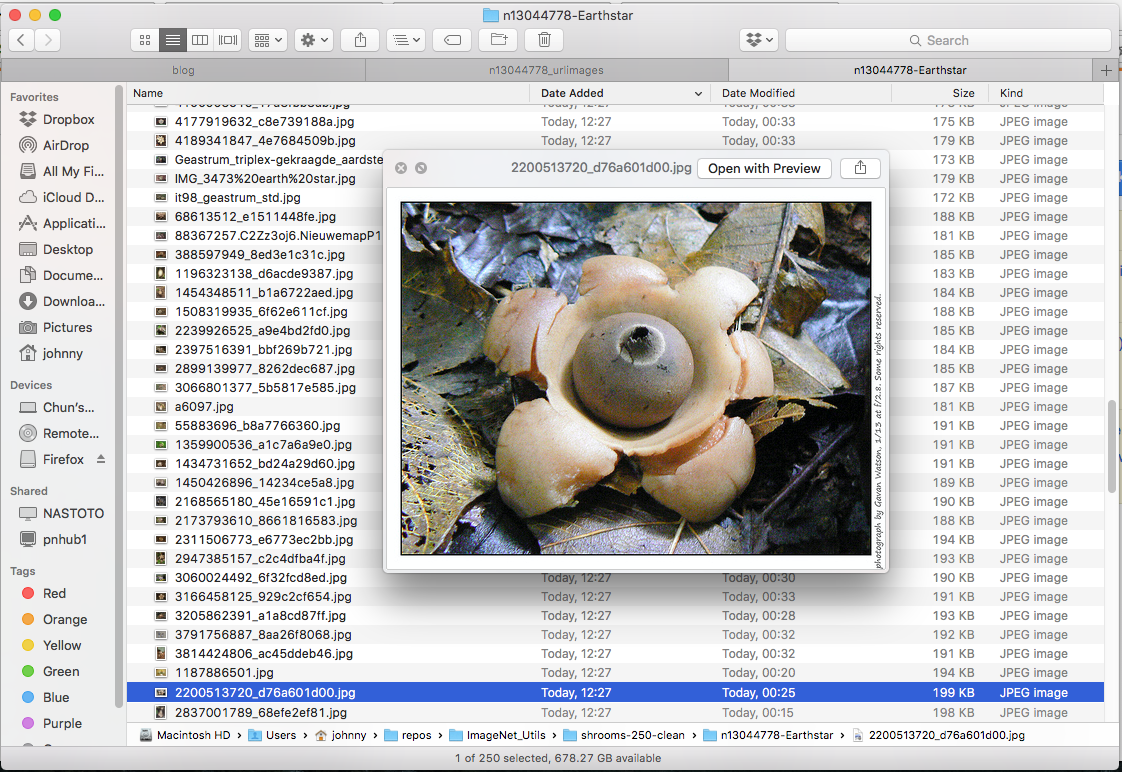
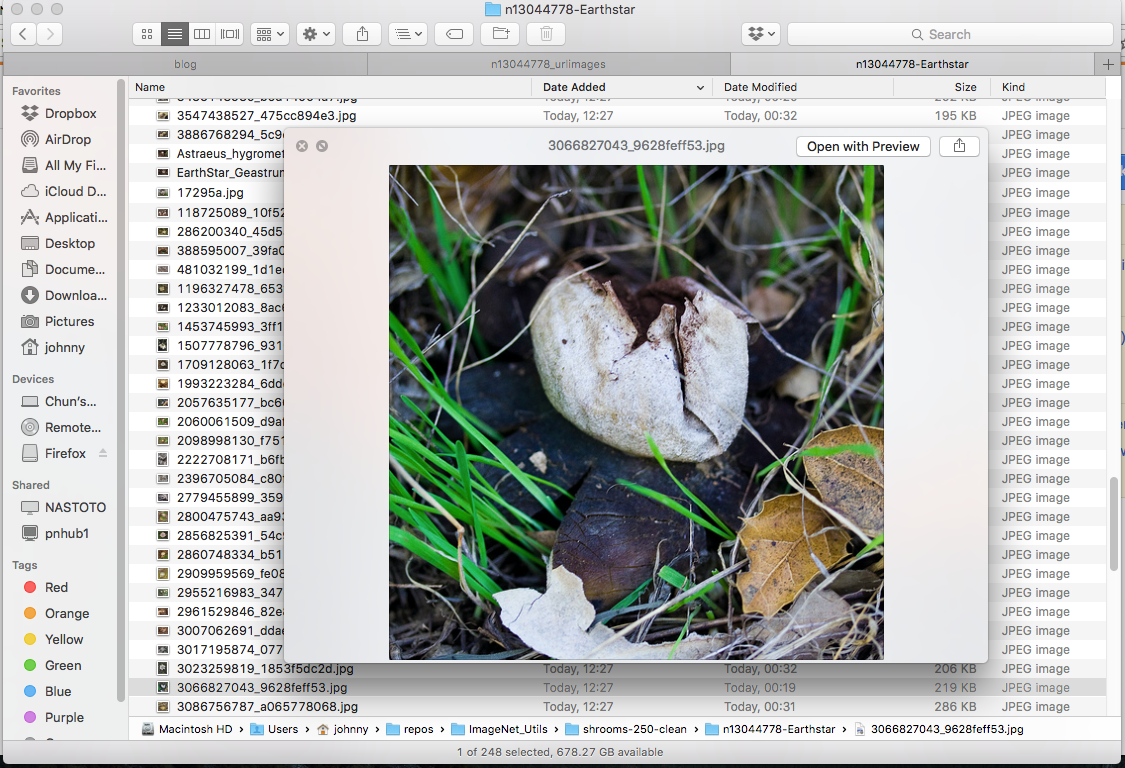
Example: Invnalid Earth Star (delete these)
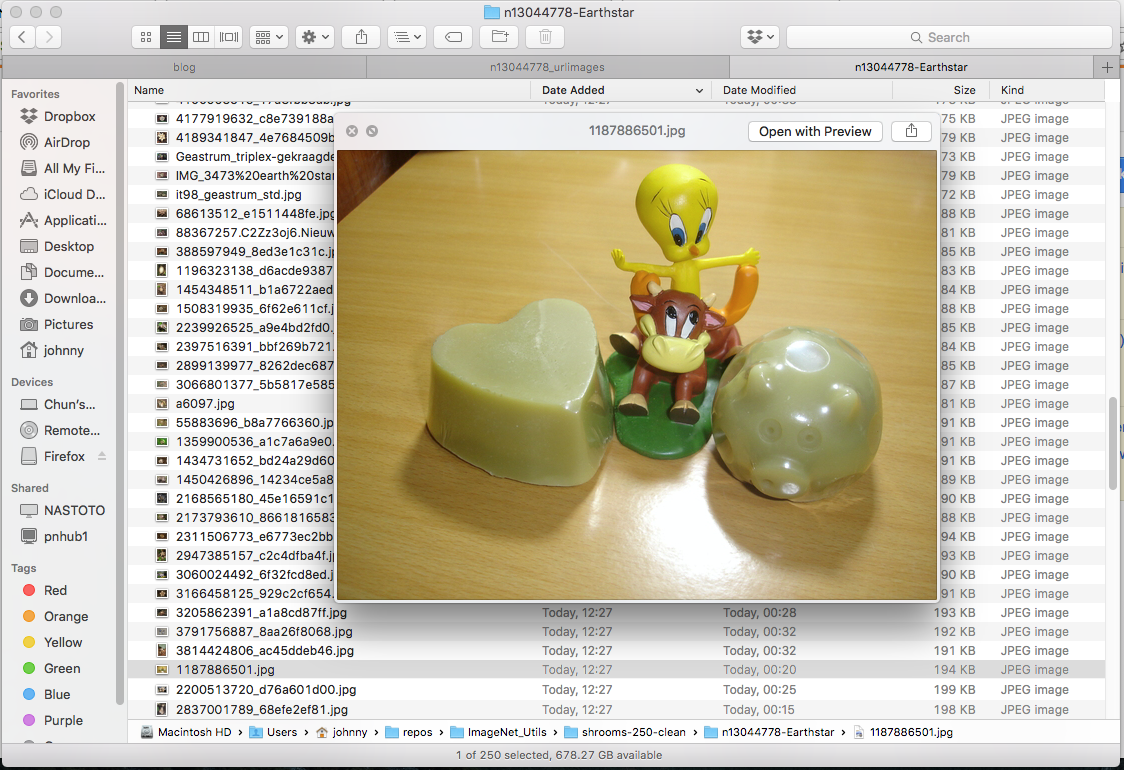
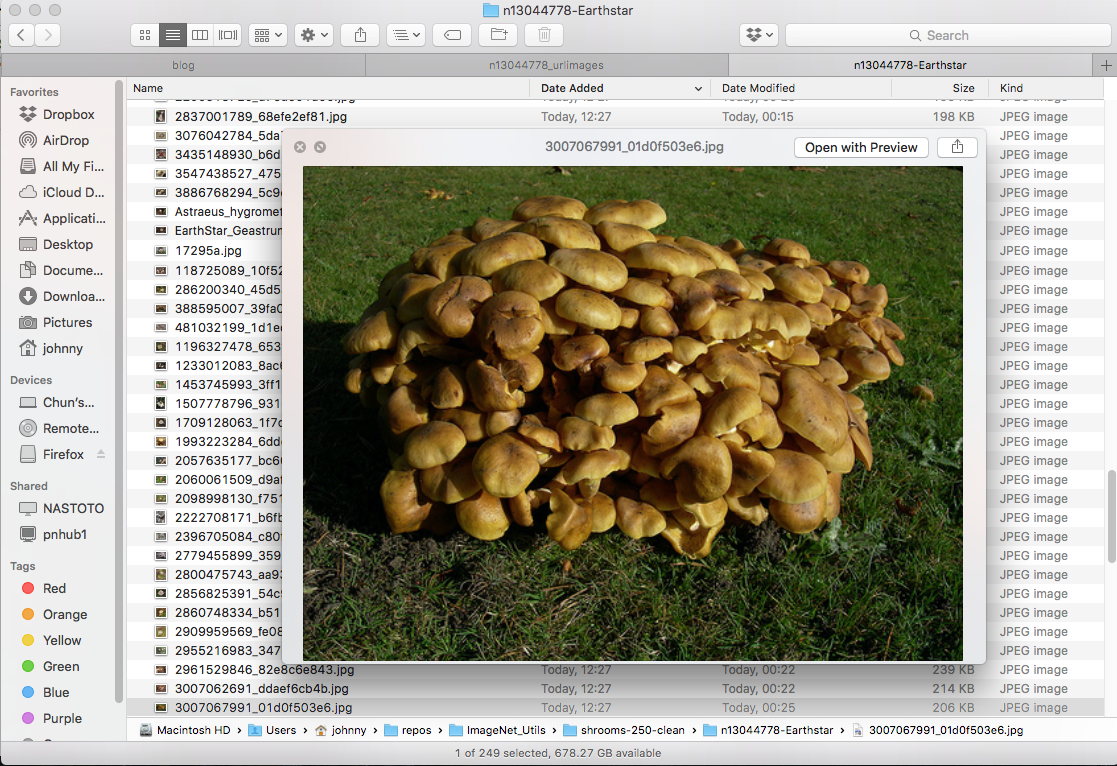
(Note: reason for deleting some mushroom images is that they are in the wrong category! Earth star should have star shape. This requires a bit domain knowledge / google-ing)
Notice that as we delete images, our “250 per bucket” will start to fall short. In this case, just add more unused images and repeat the cleaning step (probably a few times). In the end of we should have 250 clean images per category, stored at ~/repos/my-ImageNet_Utils/shrooms-clean-250-each/.
Prepare the clean data for tensorflow for poets
First of all, recall our directory structure:
|- repos
  |- my-ImageNet_Utils
  |- my-tensorflow-for-poets
So far we have been working with the my-ImageNet_Utils repository: we’ve downaloded raw ImageNet images there and prepared 250 clean images per wild mushroom category - all stored under ~/repos/my-ImageNet_Utils/shrooms-clean-250-each/.
We now need to copy the images accordingly to the my-tensorflow-for-poets, so we can run some scripts to perform transfer learning and predictions. If you have come across the tensorflow for poets exercise previously, you would have learnt that all the (untracked) working files are stored under ~/repos/my-tensorflow-for-poets/tf_files. This will include images for retraining, the retrained models / graphs, labels, etc. We can basically store anything relating to retraining in this location for convenience.
Prepare 200 Images per category for transfer learning
Create the shrooms-train-200-each folder at ~repos/my-tensorflow-for-poets, and create a similar directory structure to the shrooms-clean-250-each that we created and populated earlier:
(py27p13) $ cd ~/repos/my-tensorflow-for-poets/tf_files
(py27p13) $ mkdir shrooms-train-200-each
(py27p13) $ cd shrooms-train-200-each
(py27p13) $ mkdir n13003061-fly-agaric
(py27p13) $ mkdir n13030337-scarlet-elf-cup
(py27p13) $ mkdir n13040629-common-stinkhorn
(py27p13) $ mkdir n13044375-giant-puffball
(py27p13) $ mkdir n13044778-Earthstar
Now, open up two Finder windows:
- Finder 1 points to the clean images directory:
~/repos/my-ImageNet_Utils/shrooms-clean-250-each - Finder 2 points to the retraining images directory:
~/repos/my-tensorflow-for-poets/tf_files/shrooms-train-200-each
In Finder 1, sort the images by name. Copy the first 200 clean images per category over to Finder 2, like this:
| Category | copy from Finder 1 | paste to Finder 2 |
|---|---|---|
| Fly Agaric | ./n13003061-fly-agaric/ |
./n13003061-fly-agaric/ |
| Scarlet Elf cup | ./n13030337-scarlet-elf-cup/ |
./n13030337-scarlet-elf-cup/ |
| Common Stinkhorn | ./n13040629-common-stinkhorn/ |
./n13040629-common-stinkhorn/ |
| Giant Puffball | ./n13044375-giant-puffball/ |
./n13044375-giant-puffball/ |
| Earthstar | ./n13003061-earthstar/ |
./n13003061-earthstar/ |
Prepare 50 Images per category for prediction
This will be very similar to our previous step, but we copy over the remaining 50 unused images over for demo / prediction activities later.
Create the shrooms-demo-50-each folder at ~repos/my-tensorflow-for-poets, and create a similar directory structure to the shrooms-clean-250-each that we created and populated earlier:
(py27p13) $ cd ~/repos/my-tensorflow-for-poets/tf_files
(py27p13) $ mkdir shrooms-demo-50-each
(py27p13) $ cd shrooms-demo-50-each
(py27p13) $ mkdir n13003061-fly-agaric
(py27p13) $ mkdir n13030337-scarlet-elf-cup
(py27p13) $ mkdir n13040629-common-stinkhorn
(py27p13) $ mkdir n13044375-giant-puffball
(py27p13) $ mkdir n13044778-Earthstar
Now, open up two Finder windows:
- Finder 1 points to the clean images directory:
~/repos/my-ImageNet_Utils/shrooms-clean-250-each - Finder 2 points to the retraining images directory:
~/repos/my-tensorflow-for-poets/tf_files/shrooms-demo-50-each
In Finder 1, sort the images by name. Copy the last 50 clean images per category over to this folder, like this:
| Category | copy from Finder 1 | paste to Finder 2 |
|---|---|---|
| Fly Agaric | ./n13003061-fly-agaric/ |
./n13003061-fly-agaric/ |
| Scarlet Elf cup | ./n13030337-scarlet-elf-cup/ |
./n13030337-scarlet-elf-cup/ |
| Common Stinkhorn | ./n13040629-common-stinkhorn/ |
./n13040629-common-stinkhorn/ |
| Giant Puffball | ./n13044375-giant-puffball/ |
./n13044375-giant-puffball/ |
| Earthstar | ./n13003061-earthstar/ |
./n13003061-earthstar/ |
We won’t need the terminal window anymore. Just close it.
Step 3: Choosing a Model
The tensorflow for poets retraining script can retrain either Inception V3 model or MobileNet.
- Inception V3 model: optimized for accuracy, at the cost of size (1st choice accuracy of 78% on ImageNet, and 85 MB in size)
- MobileNets: optimized to be small and efficient, at the cost of some accuracy (1st choice accuracy of 70.5% on ImageNet, and 19 MB in size)
Let’s keep it simple. Use MobileNet - as suggested in Tensorflow for Poets. Once we’ve got this working nicely, we may try Inception v3 / other models in future.
Step 4: Training
This is probably one of the most important steps. We will follow the tensorflow for poets retraining guide.
Setup Python 3.x Tensorflow environment
On Python version: Python 3.x is likely to be more supported in the long run (comparing to 2.x). So let’s use it.
On Tensorflow version: At the time of writing this, tensorflow is on version 1.4.1, which includes tensorflow-tensorboard (version v0.4.0rc3). This will likely change as time goes by.
We will be reusing the instructions from our previous article Tensorflow for Poets.
Create a conda environment with Anaconda (this may take a while). If you’ve already done this previously, feel free to skip this step. Open a brand new terminal window:
$ cd ~
$ conda create --name py36-tf14 python=3.6 --channel conda-forge
Activate conda environment:
$ source activate
$ source activate py36-tf14
Our command prompt should now look like this:
(py36-tf14) $
Install tensorflow with pip:
(py36-tf14) $ pip install "tensorflow==1.4.1"
Side note: why not use conda install tensorflow instead? My answer: at the time of writing this article, the Tensorflow on conda-forge channel was only up to 1.4.0. Tensorboard turned out to be a bit buggy with this version (from what I’ve seen). Install Tensorflow with pip with version 1.4.1 seems to have fixed it. (this version may be even higher as time goes by).
Our conda environment should now look like this:
(py36-tf14) $ conda list
# packages in environment at /Users/johnny/anaconda/envs/py36-tf14:
#
bleach                    1.5.0                     <pip>
ca-certificates           2017.11.5                     0    conda-forge
certifi                   2017.11.5                py36_0    conda-forge
enum34                    1.1.6                     <pip>
html5lib                  0.9999999                 <pip>
Markdown                  2.6.10                    <pip>
ncurses                   5.9                          10    conda-forge
numpy                     1.13.3                    <pip>
openssl                   1.0.2n                        0    conda-forge
pip                       9.0.1                    py36_0    conda-forge
protobuf                  3.5.0.post1               <pip>
python                    3.6.3                         4    conda-forge
readline                  7.0                           0    conda-forge
setuptools                38.2.4                   py36_0    conda-forge
six                       1.11.0                    <pip>
sqlite                    3.20.1                        0    conda-forge
tensorflow                1.4.1                     <pip>
tensorflow-tensorboard    0.4.0rc3                  <pip>
tk                        8.6.7                         0    conda-forge
Werkzeug                  0.13                      <pip>
wheel                     0.30.0                     py_1    conda-forge
xz                        5.2.3                         0    conda-forge
zlib                      1.2.11                        0    conda-forge
Note: at the time of writing this, tensorflow v1.4.1 seems to work well with tensorflow-tensorboard v0.4.0rc3 (aka tensorboard).
Start TensorBoard in the background
I just wanted to emphasize, Tensorboard is awesome. I’ve learnt a great deal on model training with Tensorboard and would highly recommend using it for two main visualization charts:
- accuracy (higher the better)
- cross entropy (lower the better)
Let’s start tensorboard in the background
(py36-tf14) $ cd ~/repos/my-tensorflow-for-poets
(py36-tf14) $ tensorboard --logdir tf_files/training_summaries --host=localhost &
If it works, navigate to http://localhost:6006 and see the TensorBoard frontend:
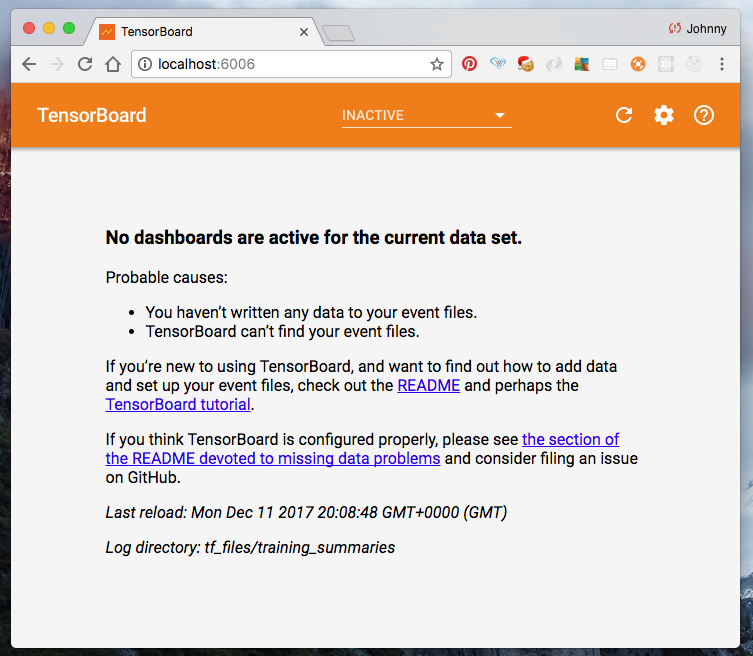
Note: if we wish to re-run the above tensorboard command, make sure we kill the previously created tensorboard session (to avoid port collision). In fact, let’s try it. Issue the following to kill Tensorboard:
(py36-tf14) $ pkill -f "tensorboard"
Now that tensorboard is killed, http://localhost:6006 should now show nothing.
To start Tensorboard again, just issue this again:
(py36-tf14) $ tensorboard --logdir tf_files/training_summaries --host=localhost &
Navigate back to http://localhost:6006, Tensorboard is back!
OK you’ve got the idea. (side note: from experience, we will likely start and kill Tensorboard from time to time, as needed.)
Configure our MobileNet
There are two main MobileNet configuration hyperparameters: Input image resolution (TFP_IMAGE_SIZE) and relative size (TFP_RELATIVE_SIZE). According to the Tensorflow for Poets retraining guide, pick the following configuration options:
- Input image resolution (
TFP_IMAGE_SIZE):128,160,192, or224px. Unsurprisingly, feeding in a higher resolution image takes more processing time, but results in better classification accuracy. We recommend 224 as an initial setting. - The relative size (
TFP_RELATIVE_SIZE) of the model as a fraction of the largest MobileNet:1.0,0.75,0.50, or0.25. We recommend0.5as an initial setting. The smaller models run significantly faster, at a cost of accuracy.
Let’s set these as shell environmental variables for the current terminal you are in. Just simply copy the following block, paste it in terminal, and run it:
export TFP_IMAGE_SIZE="224"
export TFP_RELATIVE_SIZE="0.50"
export TFP_ARCHITECTURE="mobilenet_${TFP_RELATIVE_SIZE}_${TFP_IMAGE_SIZE}"
Let’s confirm that we’ve set these variables correctly (copy the following block, paste it in terminal, and run it):
echo ${TFP_IMAGE_SIZE}
echo ${TFP_RELATIVE_SIZE}
echo ${TFP_ARCHITECTURE}
You shall see:
244
0.50
mobilenet_0.5_224
Note: if we wish to try out other MobileNet configuration options, just edit the environmental variable export scripts above and re-run.
Wait, what if I want to use Inception V3?
In case you would like to use the Inception V3 architecture (instead of MobileNet), just simply do the following instead:
export TFP_ARCHITECTURE="inception_v3"
The retrain script we run later on only cares about the environmental variable TFP_ARCHITECTURE.
Configure Image Retrain Path
We need to tell the retrain script where to find our training images (i.e. our 200 per category). By default the retrain script will use a split of 80% (160) train / 10% (20) validation / 10% (20) test, but we can alter that in our retrain script later.
But first, we need to export one more environmental variable. i.e. the root directory name of the training images - which if you recall from step 2 on data preparation, it is shrooms-train-200-each.
Copy the following line, paste it in terminal, and run it:
export TFP_IMAGES_DIR="shrooms-train-200-each"
How to use the retrain script
Ensure we are in the correct location:
(py36-tf14) $ cd ~/repos/my-tensorflow-for-poets
To see what options are there:
(py36-tf14) $ python -m scripts.retrain -h
Do the training
Copy the following block, paste it in terminal, and run it (this will start the re-training). Notice we are using the environmental variables (TFP_IMAGES_DIR and TFP_ARCHITECTURE) that we exported earlier. That’s the reason for setting up those environmental variables eariler.
python -m scripts.retrain \
  --image_dir=tf_files/${TFP_IMAGES_DIR} \
  --bottleneck_dir=tf_files/bottlenecks \
  --model_dir=tf_files/models/ \
  --summaries_dir=tf_files/training_summaries/basic/"${TFP_ARCHITECTURE}" \
  --output_graph=tf_files/retrained_graph.pb \
  --output_labels=tf_files/retrained_labels.txt \
  --how_many_training_steps=500 \
  --architecture="${TFP_ARCHITECTURE}"
A bit of explanation (with the help of the official Tensorflow for Poets tutorial)
-
image_dir: this is where we’ve stored our training images. The directory must exist already. Otherwise the script will fail. -
bottleneck_dir: A bottleneck is an informal term we often use for the layer just before the final output layer that actually does the classification. Every image is reused multiple times during training. Calculating the layers behind the bottleneck for each image takes a significant amount of time. Since these lower layers of the network are not being modified their outputs can be cached and reused. The directory will be automatically created. -
model_dir: The location where the “frozen” MobileNet models are downloaded. The directory will be automatically created. -
summaries_dir: the directory where tensorboard summaries will be saved to. Note our use of${TFP_ARCHITECTURE}- if we are to try out a different MobileNet configuration option, the script will create a tensorboard summary without overwriting our old ones. The benefit of this option is to enable us to name-space our summary - so we can do some comparisons in our tuning step before commiting to the model(s) we want to use in production environment later on. We will see our training and validation summary in Tensorboard under the namespace calledbasic/${TFP_ARCHITECTURE}. (as you will see shortly). One thing to mention now - later on if you want to perform hyperparameter tuning, you may wish to namespace the summary assomething-else/"${TFP_ARCHITECTURE}. -
output_graph: this is our new (re)trained graph file. The prediction phase later on will need this. If we are to deploy our prediction model on an embedded device, this will likely just save a copy of this file to the device. -
output_labels: this file shows our ground truth labels - extracted from ourimage_dirdirectory structure. The prediction phase later on will need this. If we are to deploy our prediction model on an embedded device, this will likely just save a copy of this file to the device. -
how_many_training_steps: the script will run for 4000 steps (aka epochs) by default. This may take 30 minutes. By reducing this to 500 steps, the script may complete within around 5 minutes on a modern CPU laptop, while giving us reasonable good accuracy (of around 85-95%.). Handy for what we are trying to achieve, which is to get from start to the end as quickly as possible, while producing an output that is reasonable good enough.
Note that most of these options have a default value and we don’t strictly need to specify all of them. I would highly recommend to take a good read of the retrain script, try and understand how it works and what it does, etc.
One more thing to note, by default the script uses this split: 80% train / 10% validation / 10% test. Given we have 200 images per category, we will be using 160 for training, 20 for validation, and 20 for testing. We can however adjust this split accordingly by specifying options when running the script.
Wait for the script to run. Should all go well we should get a final validation accuracy of somewhere between 85-95%.
Step 5: Evaluation
Tensorboard is the place to go - to evaluate how good our retrained model is. The intuitions are:
- training accuracy graph should be concave down and increasing towards 100% as we perform more epochs (steps). See diagram below (bottom right).
- training cross entropy should be concave up and decreasing towards 0 as we perform more epochs (steps). See diagram below. (top left)
- validation trend should closely resemble training trend. If the two lines deviate too much, it implies the model is not generic enough.
The above image was kindly borrowed from Paul’s Online Math Notes - on the shape of a graph
Visualize training summary on Tensorboard
If tensorboard is already running, navigate to http://localhost:6006 to visualize.
Otherwise, copy the following block to a terminal, run it (to get tensorboard running)
cd ~/repos/my-tensorflow-for-poets
pkill -f "tensorboard"
tensorboard --logdir tf_files/training_summaries --host=localhost &
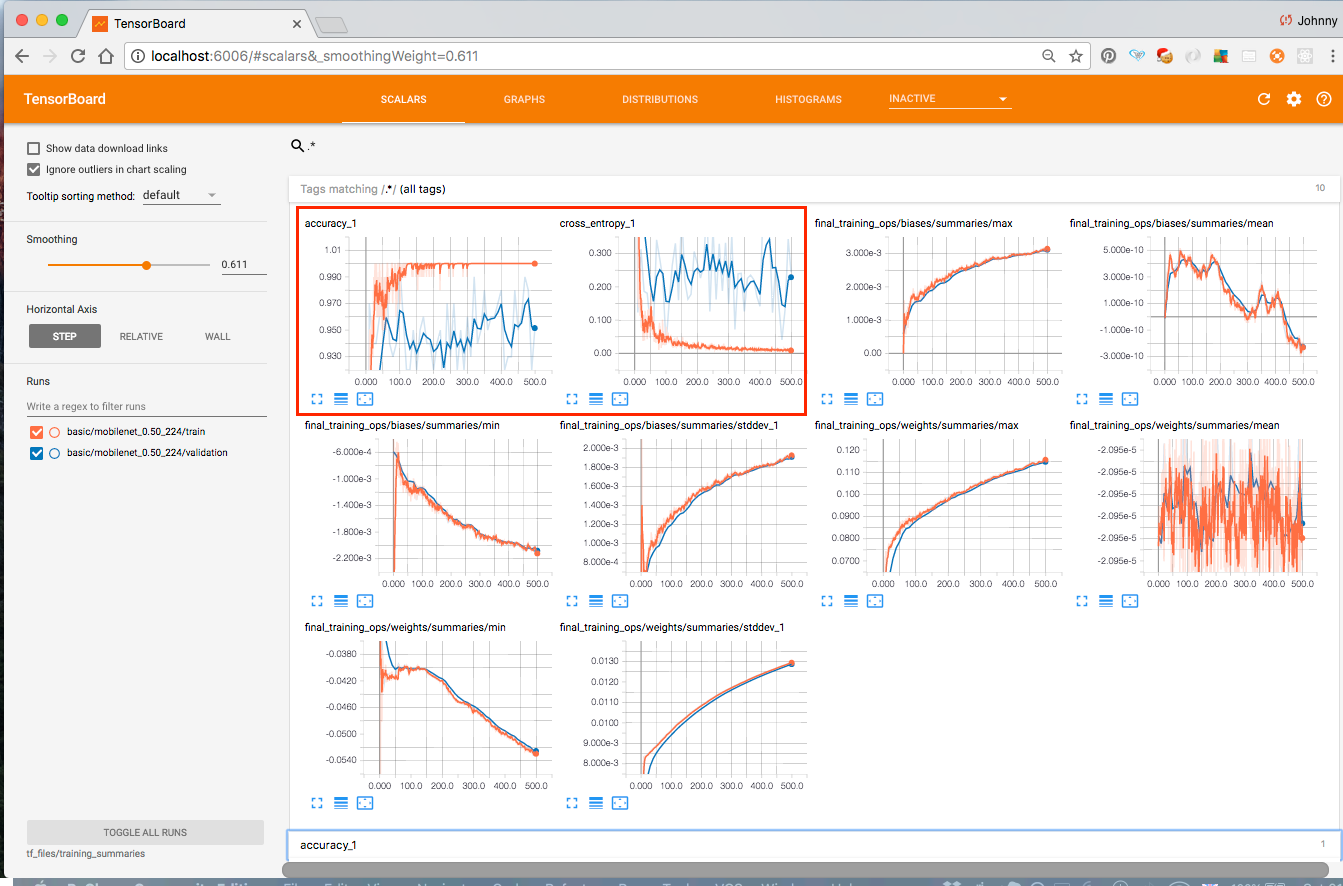
If it works, we shall see the accuracy chart (higher the better), cross entropy chart (lower the better), and other analysis.
As this is our first attempt to this problem (without too much hyperparameter tuning), it should be expected that the validation result to be not as good as the training result. Despite that, we still get over 90% accuracy in our validation set (which is actually, pretty good considering we haven’t performed much tuning at this stage, and our restricted number of retraining image samples).
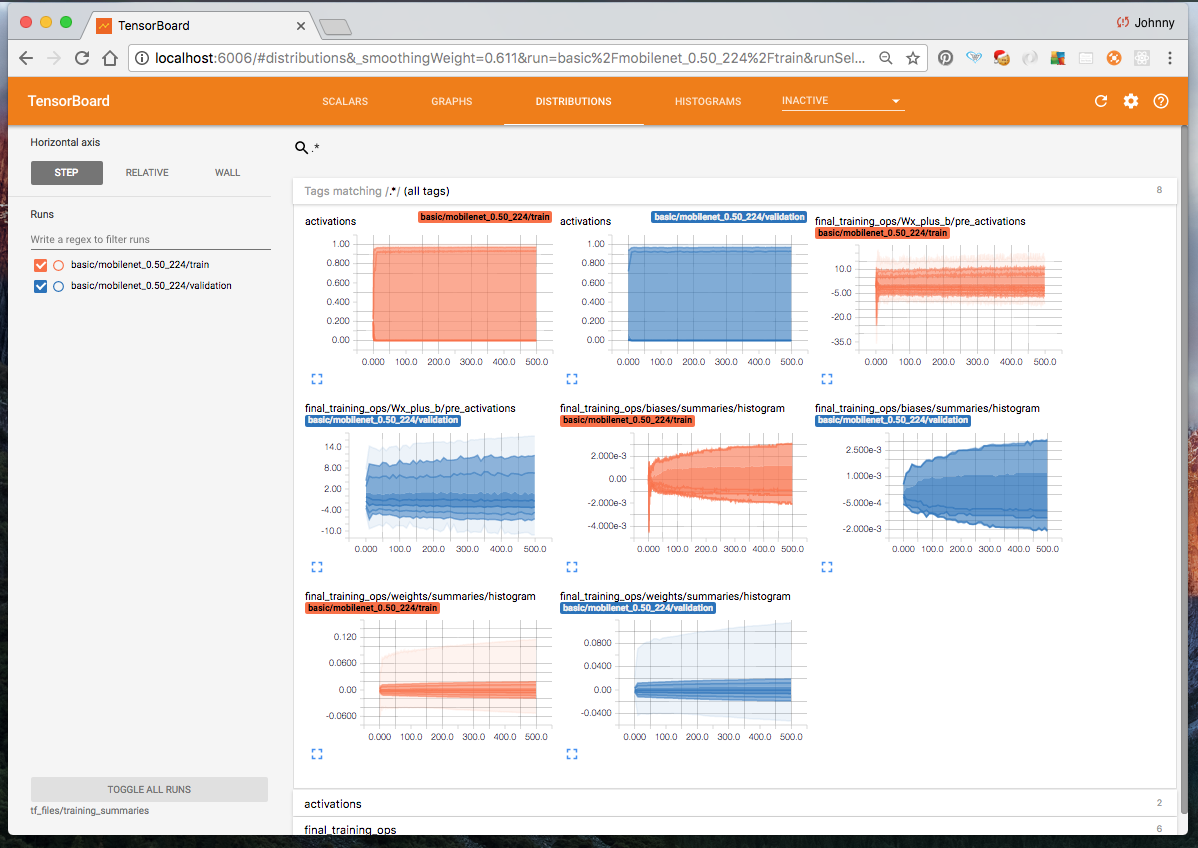
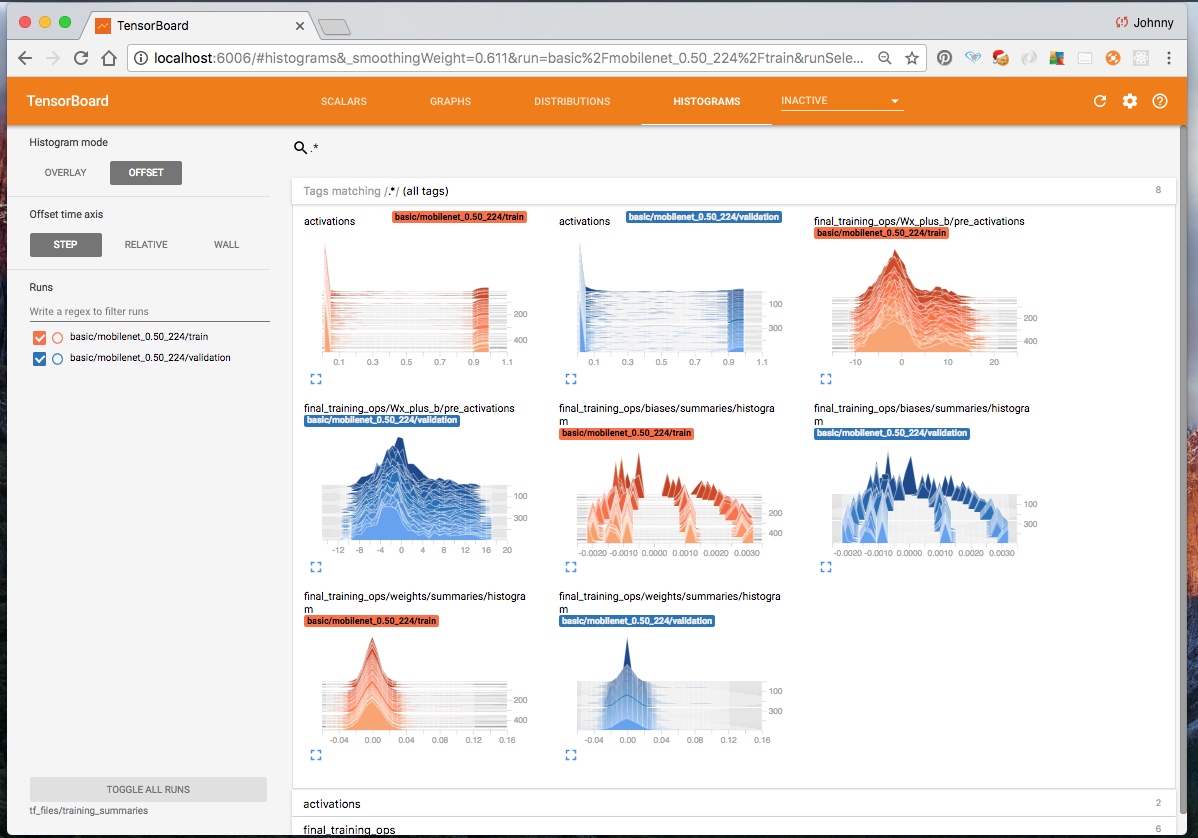
Here are some snapshots from Tensorboard:
Accuracy, Cross Entropy, and more
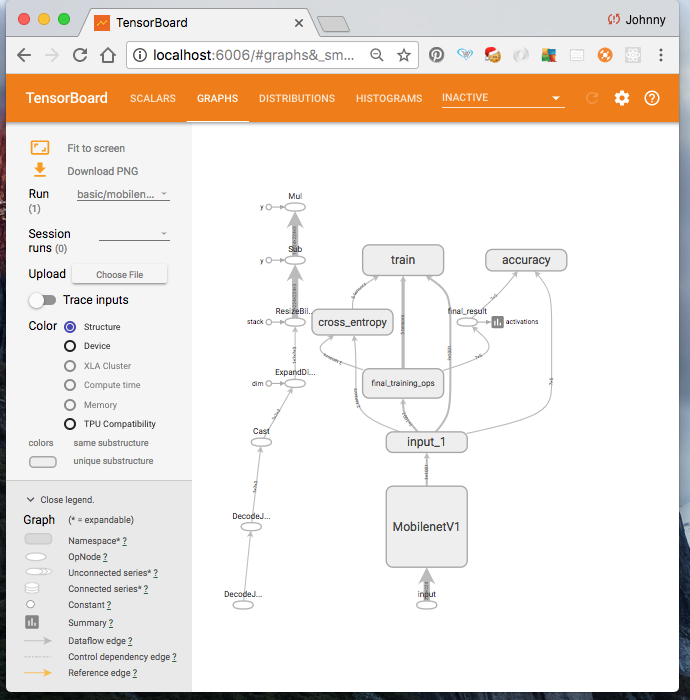
Graph
Distribution
Histogram
We shall do more deep dive into tensorboard at a later time. For now, let’s just say our main interests are the accuracy and cross entropy charts. (in fact, I would say accuracy is probably the most important one. We need high accuracy for both training and validation)
Step 6: Hyperparameter Tuning
I would suggest for the purpose of this article we skip hyperparameter tuning for now. It deserves an article on its on - so let’s do this in a separate article.
To see what options are there:
(py36-tf14) $ cd ~/repos/my-tensorflow-for-poets
(py36-tf14) $ python -m scripts.retrain -h
To see the default values take a look at the retrain script (~repos/my-tensorflow-for-poets/scripts/retrain.py) options and default values. This will give us some inspiration on some of the hyperparameters we may use for tuning. I’ve taken a look at the script myself and put my findings into the following table for ease of references (you may need to scroll right to see more).
| option | type | default value | description |
image_dir |
str |
"" |
Path to folders of labeled images. |
output_graph |
str |
"/tmp/output_graph.pb" |
Where to save the trained graph. |
intermediate_output_graphs_dir |
str |
"/tmp/intermediate_graph/" |
Where to save the intermediate graphs. |
intermediate_store_frequency |
int |
0 |
How many steps to store intermediate graph. If “0” then will not store. |
output_labels |
str |
"/tmp/output_labels.txt" |
Where to save the trained graph’s labels. |
summaries_dir |
str |
"/tmp/retrain_logs" |
Where to save summary logs for TensorBoard. |
how_many_training_steps |
int |
4000 |
How many training steps to run before ending. |
learning_rate |
float |
0.01 |
How large a learning rate to use when training. |
testing_percentage |
int |
10 |
What percentage of images to use as a test set. |
validation_percentage |
int |
10 |
What percentage of images to use as a validation set. |
eval_step_interval |
int |
10 |
How often to evaluate the training results. |
train_batch_size |
int |
100 |
How many images to train on at a time. |
test_batch_size |
int |
-1 |
How many images to test on. This test set is only used once, to evaluate the final accuracy of the model after training completes. A value of -1 causes the entire test set to be used, which leads to more stable results across runs. |
validation_batch_size |
int |
100 |
How many images to use in an evaluation batch. This validation set is used much more often than the test set, and is an early indicator of how accurate the model is during training. A value of -1 causes the entire validation set to be used, which leads to more stable results across training iterations, but may be slower on large training sets. |
print_misclassified_test_images |
bool |
False |
Whether to print out a list of all misclassified test images. |
model_dir |
str |
"/tmp/imagenet" |
Path to classify_image_graph_def.pb, imagenet_synset_to_human_label_map.txt, and imagenet_2012_challenge_label_map_proto.pb
|
bottleneck_dir |
str |
"/tmp/bottleneck" |
Path to cache bottleneck layer values as files. |
final_tensor_name |
str |
"final_result" |
The name of the output classification layer in the retrained graph. |
flip_left_right |
bool |
False |
|
random_crop |
int |
0 |
A percentage determining how much of a margin to randomly crop off the training images. |
random_scale |
int |
0 |
A percentage determining how much to randomly scale up the size of the training images by |
random_brightness |
int |
0 |
A percentage determining how much to randomly multiply the training image input pixels up or down by. |
architecture |
str |
"inception_v3" |
Which model architecture to use. ‘inception_v3’ is the most accurate, but also the slowest. For faster or smaller models, chose a MobileNet with the form ‘mobilenet_ |
Step 7: Prediction
Firs of all, make sure we are at the appropriate location:
(py36-tf14) $ cd ~/repos/my-tensorflow-for-poets
To perform a prediction we use the label_image script (copy following block, paste in a terminal, and run it)
python -m scripts.label_image \
    --graph=tf_files/retrained_graph.pb  \
    --image=tf_files/shrooms-demo-50-each/n13003061-fly-agaric/110269850_ea5678a3ef.jpg
Note: the demo images in tf_files/shrooms-demo-50-each/ were not used in our training step earlier - so it should be fun to visualize.
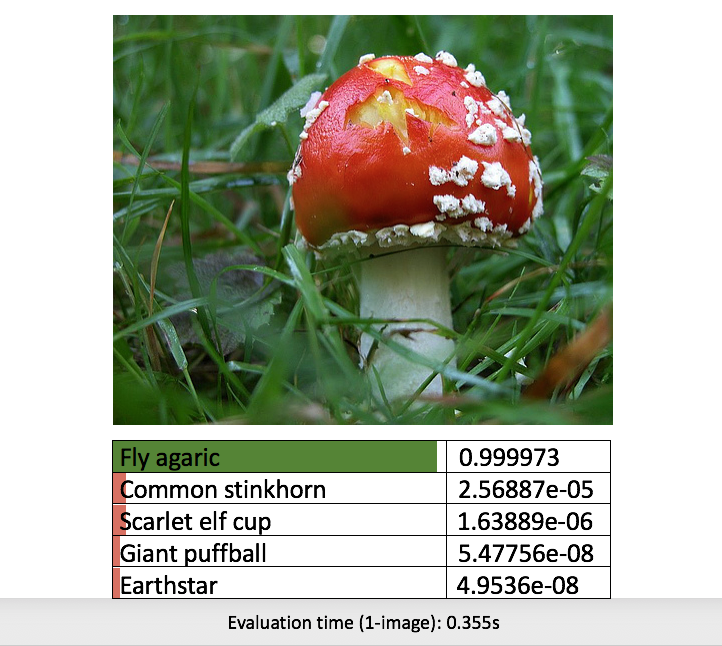
We should get an output like this in the terminal:
Evaluation time (1-image): 0.237s

n13003061 fly agaric 0.999988
n13040629 common stinkhorn 1.22072e-05
n13044778 earthstar 8.6851e-08
n13044375 giant puffball 3.17381e-08
n13030337 scarlet elf cup 1.16116e-08
Yay! The image is a Fly Agaric, and the model predicted high confidence that it is a Fly Agaric (and low for other categories).
Feel free also to take a look at what other options are out there:
(py36-tf14) $ python -m scripts.label_image -h
try out a handful of prediction manually
Just to quickly see for ourself that our retrained model is what we would expect to see, let’s try perform predictions on a few more handful demo images! For the purpose of this article, I’m going to manually run the predict script one by one, for (say) 3 demo images per categories (for the 5 categories) - so we get an idea of our application outputs.
Instead of printing the boring texts, I will manually do some “artistic” editing with PowerPoint - just to get the idea across a bit more effectively (this is to avoid performing excessive programming at such an early phase)
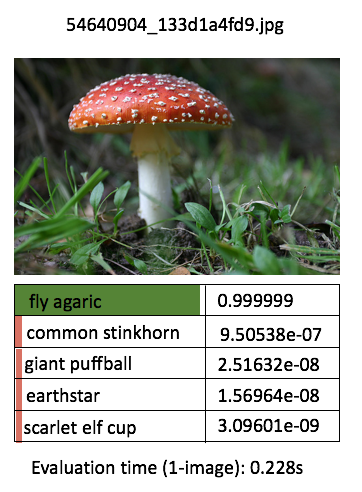
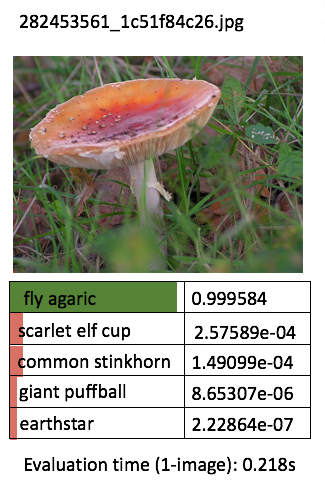
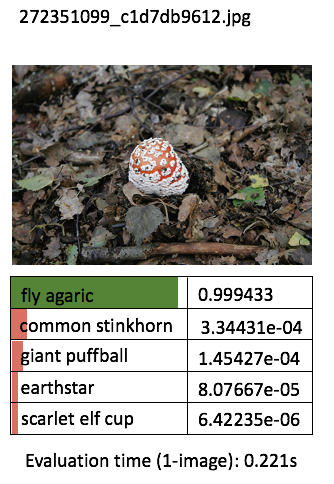
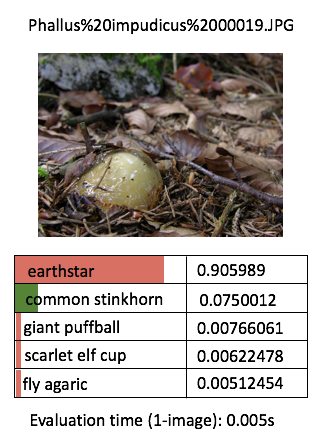
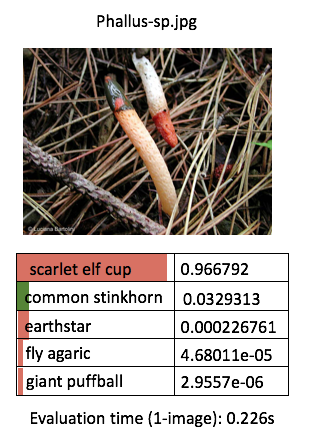
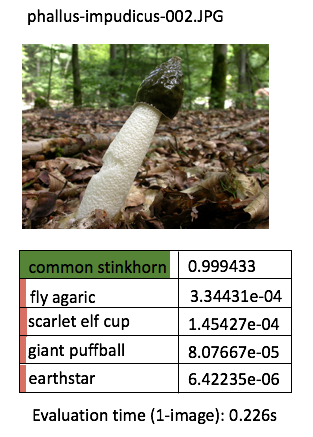
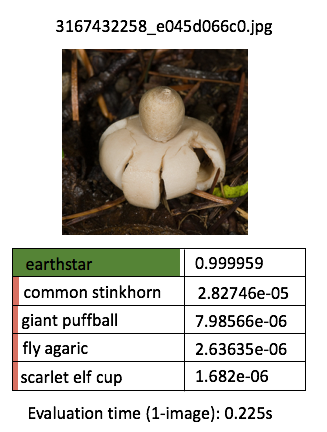
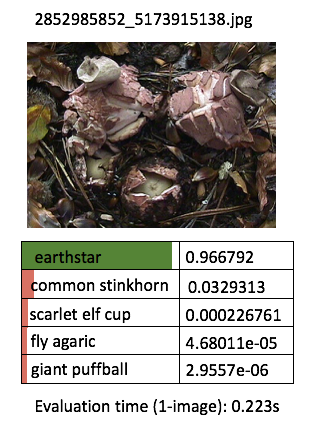
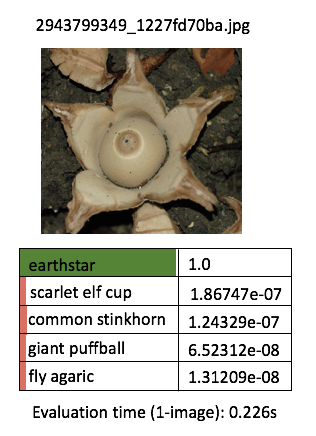

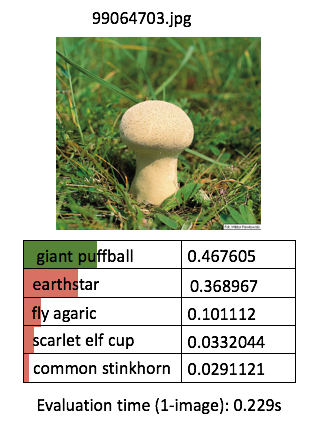
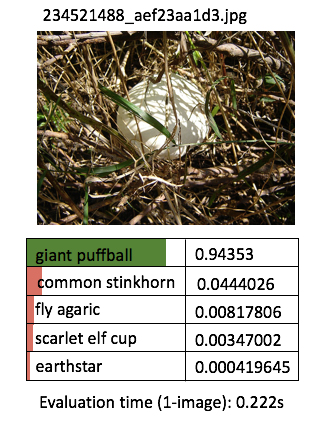
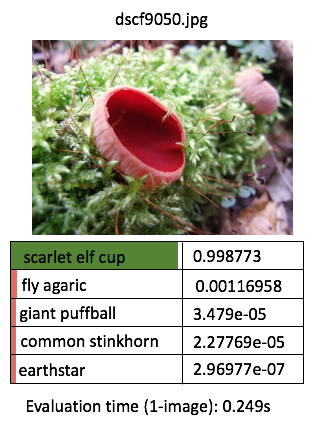
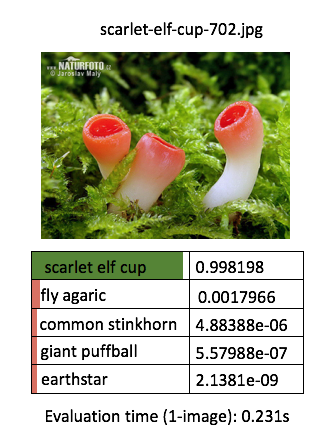
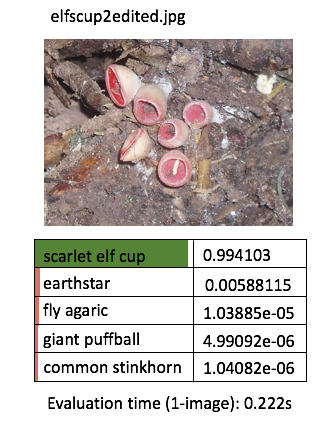
One thing I’ve learnt about deep learning is that the prediction performance depends heavily on the training data. The model is more likely to be able to classify correctly / with high confidence when the test image contains features that are similar to the corresponding training images. The prediction confidence is likely low when the test image deviates a lot from the training image.
One more thing, as we train on more categories (say 1000 instead of just 5), the prediction confidence will be less concentrated. i.e. if you feed in an image that is not a mushroom, but a car, hopefully it will provide very low probabilities across a range of mushroom labels, instead of just wrongly predict it is a “fly agaric” with high confidence. Just a theory.
create an automated prediction process
It would be beneficial to have some kind of slide show type app that flash through the demo images one by one, or in batches, to show the prediction vs ground truth, along with the overall accuracy / errors. Sort of like this ReactJS frontend demo but hopefully better! (This will be another project for another time.)
Potential Improvement Opportunities
Some ideas to jot down:
- study the tensorflow for poets retrain and prediction scripts. Could we use other better options?
- an utility to enable user to upload photos and obtain prediction on the fly
- hook up the retrained model to perform prediction offline? (e.g. rasberry pi, camera, Movidius Neural Compute stick?)
- more automated / systematic way to regularly obtain more training images, perform retraining, update models?
- A/B testing of different models?
- video streaming and perform prediction on the fly?
- perform training on more mushroom categories?
- use crops to generate more data?
- hyperparameter tuning?
- YOLO?
- Do some deepvis type visualization of the neural network?
- etc.
Summary
In this article we’ve had a go creating a basic wild mushroom classification app that performs image classification on 5 types of mushroom with the help of Google’s 7 steps to machine learning, and the Tensorflow for Poets Google lab. We’ve successfully performed a start-to-finish iteration on building our first app and gained some hands-on experiences. We’ve discussed some potential improvements and next steps that we may try out later on.
Just to recall, here are the 7 steps to machine learning:
- Gathering Data
- Preparing that Data
- Choosing a Model
- Training
- Evaluation
- Hyperparameter Tuning
- Prediction
We will revisit Hyperparameter Tuning in a separate article. We will also try and improve our app further with automation and standardization etc.
Congratulation. You’ve now gained some hands-on experience implementing transfer learning. I hope this will get you started on doing something even more exciting.